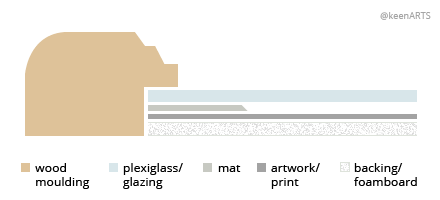
| FRAME FITTING, SECURING THE CONTENTS OF A FRAME: |
 |
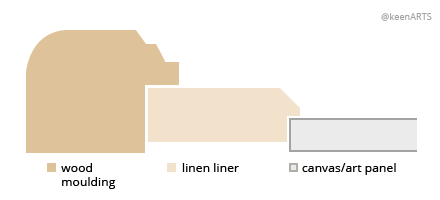
If you have received your printed canvas or fine art paper without a frame, you may need to mount it into your frame from home.
Below are several options for both metal and wood frames. This how-to also features a section on mounting a rolled canvas onto stretcher bars.
Regardless of your product, your previous experience with framing, or your budget, these tips should help you put together a beautiful work of art. If you still have difficulty after reading this guide, please don't hesitate to contact us - we're always happy to help.
|
Point Gun
A Point Gun (also called a Point Driver, Tab Gun or Tab Driver) looks and works like a heavy duty staple gun, but instead of staples, it fires small metal rods into the wooden picture frame. Once inserted, these pins can be bent back, allowing you to change the artwork. This method also works well for mounting work permanently.
Points only work if the contents of your frame (the glass, mat, artwork and backing) lie below the wooden frame edge. The points are fired into the side of the frame, so part of the frame must be visible above the backing.
If you frame a lot of artwork, a point gun is a good investment - you must purchase both the tool itself and the points.
|

|
Fitting ToolA "point driver" looks like a vise, and serves the same purpose as a point gun. The point or tab that must be inserted into the frame is placed into one end of the tool, while the other end presses against the outside of the frame. When the two ends are forced together, the point is pushed into the frame.
This is an option for more delicate frames or artwork, where the impact of a point gun could potentially cause damage. It is also safer to use.
This method can be used to attach permanent or interchangeable artwork, depending on the type of points you purchase.
Commonly used in photo frames for easy picture change, flexible points are rigid enough for permanent installation. Multi-points are used to fasten decorative fillets or secure work mounted on stretchers, such as oil paintings or embroidery.
|


|
Glazier Points
Glazier points are another inexpensive option for softwood frames, intended for permanently securing artwork. The points are L-shaped, with a pointed end that is inserted into the frame.
A putty knife or flat head screwdriver can be used to push the glazier points into the frame. Alternately, a "point inserting tool" can be purchased for around $12.
Glazier Points are helpful for many different projects. The points can be used to hold glass in a sash before applying putty or they can be used to frame pictures in wooden frames.
Order online: Glazier Points
|

|
Taping
If you would like your artwork to remain in its frame permanently, you may want to tape the backing into place after it has been affixed with points/tabs. This will keep dust and unwelcome critters from making their home in the tiny open spaces between your backing and frame.
Many styles of wide tape will work, but a fabric or paper tape is ideal. It is relatively inexpensive, but often sold in packages of multiple rolls.
Apply the tape so it covers approximately half an inch of the frame, and as much or more of the backing. Press firmly to ensure a good seal. Each side should overlap the other, perpendicular side to achieve a neat, straight seam all the way around. If you have received rubber or felt bumpers, attach them to the bottom corners of the frame after taping.
Order online:
Brown Kraft Tape
Cloth Tape
|

|
|
Turn Buttons
If your contents are at the same level as the back of your frame, then you can use turn buttons to hold your artwork in place. These small pieces are screwed into the wooden frame so the extended tab reaches over the backing. The buttons can be swivelled when the screw is loosened slightly, making it easy to change your artwork.
If your contents are just slightly thicker or thinner than the frame, a bent turn button may work for your product. Bent buttons are attached the same way as flat buttons, but the extended tab bends down or up to hold your backing in place.
Regardless of the type of turn button you use, you will need to distribute them evenly around the diameter of the frame. Small frames may need only one in the center
Order online: Turn Buttons
|

|
|
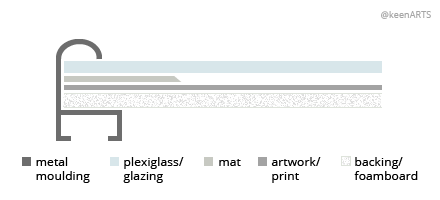
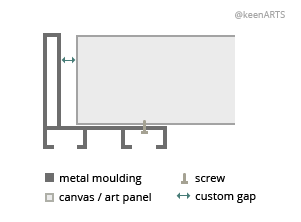
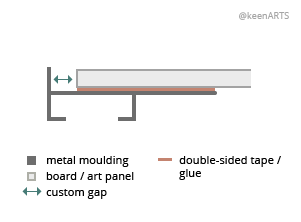
Fitting Metal Frames
Unlike most wooden frames, metal frames generally have a track into which the contents (glass, mat, artwork and backing) can slide, removing the need for clips on the edges. However, the track should be deep enough to fit a relatively thick stack, so it may be too wide to snugly fit your contents.
The spring clips (U-shaped rods of thin metal) provided in your hardware assembly kit will solve this issue. Once your frame is assembled, place a spring clip on the backing, arch side up, close to the frame.
You will want to space your clips evenly around the perimeter. If you have a small frame, you likely received four clips, and they can be placed in the middle of each frame bar. If you have a larger frame, you will have 6 - 8 clips.
Press down on the center of the spring clip and slide it between the backing and the frame. It should push the contents toward the front. Once all the clips are in place, your artwork will be secure and tight against the front of the frame.
Order online: Spring Clips
|

|
|
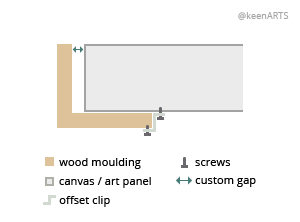
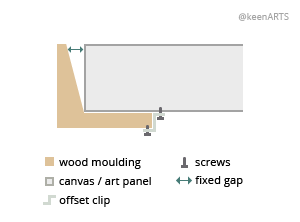
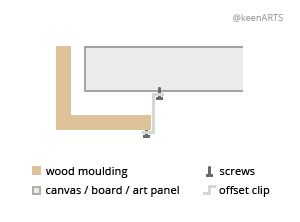
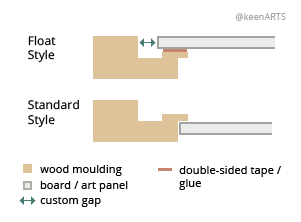
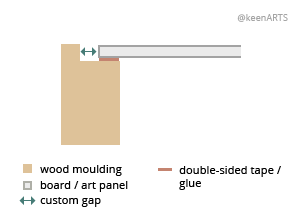
Offset Clips
Offset clips are an inexpensive way to attach your artwork when it is deeper than your frame, like a stretched canvas. They can be used on regular frames or floater frames.
One end of the clip is "stepped" higher than the other end. The lower end can be screwed into the back from the frame, creating a lip that will hold the canvas in place. Once offset clips are placed on all sides of the canvas (generally you need only one per side, regardless of the size), the canvas will be held in place against the frame.
Offset clips are available in various depths from as little as 1/8", and are also used for mounting canvases into floater frames.
Note: You will also need a screwdriver or electric drill to attach the clips.
Order online: Offset Clips
|

|
|
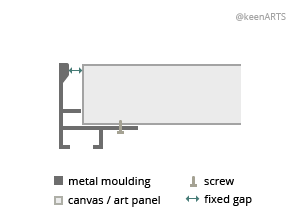
Fitting a Wrapped Canvas into a Floater Frame
Offset clips can also be used to attach your artwork to a floater frame. This process is essentially the same as the process for regular frames, but the offset clip will be flipped around.
A depth of the floater frame is generally greater than the depth of the canvas, so the higher side of the offset clip will be attached to the frame. Both sides of the clip will need to be screwed in - to the frame and the stretcher bar of the canvas.
Offset clips are available in various depths from as little as 1/8".
Order online: Canvas Offset Clips
|

|
|
Stretching a Rolled Canvas onto Stretcher Bars
Most often, KeenART Media will wrap your canvas print around a frame of wooden bars. This allows you to hang it on the wall as is - without a frame or mat.
If you have ordered a rolled canvas and plan to attach it to stretcher bars yourself, these step by step details may be of use to you.
- A stretcher bar frame is made to the dimensions of the print. The measurement of the outside edges of the frame will match the finished size of the canvas. The bars may be 1.5" or 3/4" deep, called thick gallery wrap and thin gallery wrap, respectively.
- The pre-stretched canvas will be larger than the finished size because additional space has been added for the sides of the canvas. Depending on the customer's selection, this border may be a copy of the original's edges, a mirrored image of the edge, or simply the outer edge of the image (meaning the final image will be a cropped version of the original). The width of the border depends on whether the customer has ordered a thick or thin wrap.
- The canvas is stretched very tightly around the stretcher bars, and folded neatly in the corners.
- The excess canvas is stapled onto the back side of the frame. Stapling the canvas to the back of the frame prevents any finishing from showing on the front or sides. This creates a clean, professional look.
- Cloth tape is used to conceal the staples on all four sides.
- Hanging hardware is attached inside the vertical stretcher bars on either side, 1/3 to 1/4 of the way down. Wire is wrapped around the hardware, leaving just a little bit of slack.
- The print is now ready to be displayed on the wall. It requires only a hook, which will support the canvas from the center of the wire. (Occasionally, in the case of very large canvases, two hooks may be required.)
Order online:
Stretcher Bars, pre-cut sizes, unassembled
Picture Ring Hangers
|
1. Stretcher Bars

2.

3.

|
|
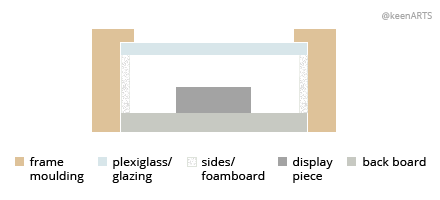
Shadow Boxes
Shadow boxes are frames with very deep rabbets. They generally have glass at the front of the frame, with as much as a few inches of space between the glass and the backing. They are often used to display three dimensional (3D) art objects or dioramas.
The best technique for fitting contents into a shadow box depends on what you are putting into it. If the backing ends up being flush against the back of the frame, turn buttons (see above) should work. If the backing is shallower than the frame, or extends beyond, then offset clips (see above) may be needed.
Order online: Artwork spacers
|

Order online: shoadow box frames
|
|
| If you still have difficulty after reading this guide, please don't hesitate to contact us - we're always happy to help.
|
Front Side |
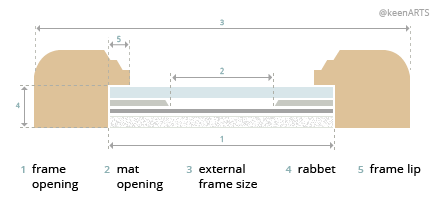
Picture framing terms |

Back Side |
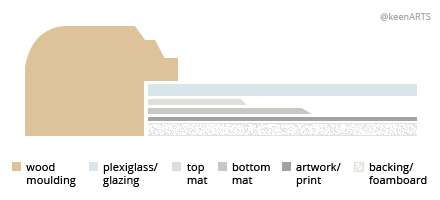
| MatBoard Guide: |
|
 Single Matboard Sample |
 Double Matboard Sample |
|
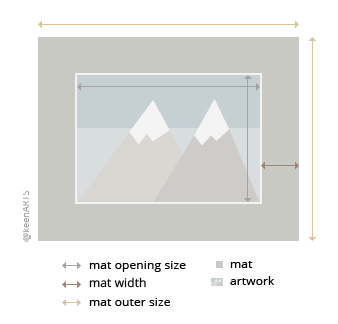
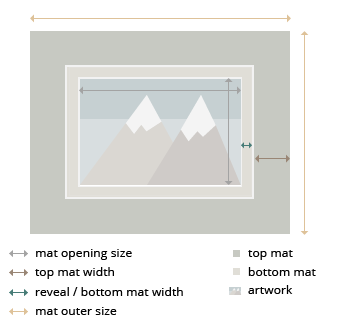
Terms:
Top Mat: Top layer of a double mat; It has a larger window, which allows a small border of the bottom mat, called the reveal, to be shown.
Bottom Mat: Optional second layer of matboard used in double matting; The window opening of the bottom mat surrounds the artwork.
Reveal: Width of the bottom mat, normally 1/4", 3/8" & 1/2"
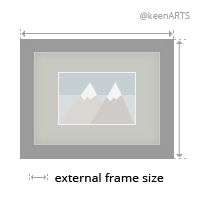
Mat Outer Size: Also known as frame opening size, matches the plexi glass or backing size of the picture frame
Artwork Size: The exact size of the artwork!
Mat Opening Size: Size of the matboard window cut out
|
|
|
Our informative articles on MatBoards:
Choosing the Best Mat Size The article offers helpful tips on selecting the appropriate mat size for your artwork.
Measuring for Mats All about Mat Outer Size, Artwork Size and Mat Opening Size
Choosing Mat Color How to select the best colors of mat fo ryour artwork
All About Mats The article discusses the different materials and attributes of picture framing mats and more!
|
|

|


|
USA Giclee On Canvas, Fine Art Printing - Art Scanning & Reproductions - Handmade Oil Paintings - Custom Wood Panels, Metal Picture Framing - Block/Plaque Mountings, Large Format Dry Mounting & Lamination - Art Supplies: Stretcher Bars, Cradled Wood Panels and Artist Canvas - Collages On Canvas - Plexi/Acrylic Face Mounts - Block Acrylics, Fabric Printing, Dye Sublimation - Cityscape Skyline Prints, Resin, Photo Gifts and more...
|
|
© 2002-2026 - KeenART Media Ltd.
|
|
| |
|