| CHOOSING THE BEST MAT SIZE |
 |
|
Adding a mat to your photograph or artwork is a great way to draw attention to it. A mat means a larger frame, which means your piece will take up more space on the wall.
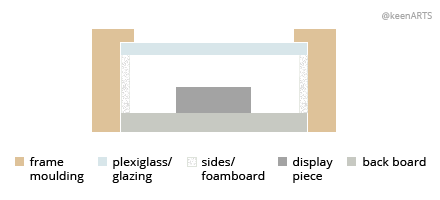
A mat is also practical - it separates the art from the glazing (glass or acrylic), and therefore protects it from moisture that may collect on the inside of the glass, and keeps the paper from adhering to the glazing.
When framing art, there are numerous things to consider:
The following article offers helpful tips on selecting the appropriate mat size for your artwork.
|
SUMMARY
| WHAT YOU HAVE |
EFFECT OF MAT SIZE |
MAT AND FRAME |
- If you have the artwork, decide how large you want the display
- If you have the frame, decide whether you want a mat and how wide to determine the artwork size
|
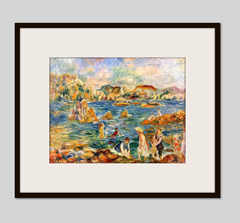
- Thin mats look out of place and distract
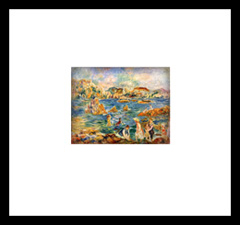
- "Average" size mats give artwork a classic look
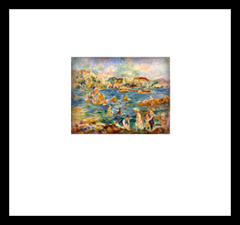
- Wide mats create a crisp, modern display
|
- The mat should usually be at least double the width of the frame
- An equal mat and frame width distracts from the art
|
|
| THE EXISTING PIECES
|
|
|
Sometimes the pieces of the puzzle you already have will make choosing a mat size very easy.
For instance, if you have a photograph you want to frame, and a frame that is too large but perfectly suits the image, you'll need to select a mat sized to the frame, with an opening the size of the artwork.
While this can be a great way to make use of old frames, a word of caution. No matter how perfectly they match, if the mat is a completely inappropriate size for the frame or for the image, that fact will dominate the display, not the beautiful symmetry of art and frame.
The size of the artwork itself can also help determine the mat. If you have a small painting you would like front and center over a mantle or other mid-sized space, consider a very wide mat. I explain below the effects of different mat sizes, but as long as the frame suits, a wide mat can be a great way to draw focus to a small image.
If you have only a frame, decide whether you want an artwork or photograph that fills the frame, or one that leaves space for a mat. Based on the information below, you can choose the style that will provide the best result.
|
The mat must suit both the art and the frame
|
| EFFECTS OF DIFFERENT MAT WIDTHS
|
|
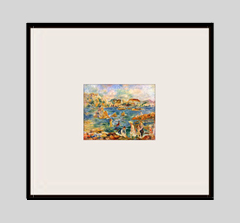
A THIN MAT
Try to avoid a thin mat at all costs. While the size of the artwork and frame will dictate what is classified as "thin," a general rule of thumb is to never have a mat less than 1-1/2 inches wide.
When you mat is too thin, it becomes a border to your artwork, rather than a complementary accent that draws the eye in. Your photograph or painting ends up looking stuffed in the frame, as though it is overriding the mat and about to burst forth. And not in a good way.
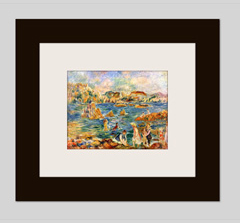
A WIDE MAT
These days, thick mats have become very popular. A 4x6" photograph in a four inch wide mat, enclosed in a thin black or gold frame is all the rage in some circles. As mentioned above, a wider mat gives your artwork more presence. What would have been in a small, desktop frame on your nightstand becomes an eye-catching, 12x14", decorative wall piece.
If you want a crisp, clean display, a thick white mat is the way to go. This is the popular style for modern gallery mats. A wider mat is also ideal for art that will be displayed over a large piece of furniture. The thick border tells the viewer this is the focal point, not the couch below.
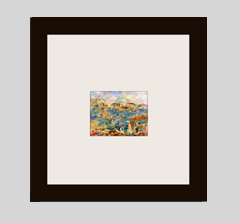
Thick mats are being used these days as art pieces of their own. A tiny, 2x3" or 3x4" image is displayed in a large white abyss with a pencil-thin frame, creating abundant white space and relegating the image to a supporting role.
THE "PERFECT MAT
There used to be very precise rules on the "perfect" mat size. While today these laws are bent and broken with style and skill, there are still many people who would rather just be told the ideal width, and that's just fine. The chart below outlines the mat size widely accepted as the best for various artwork dimensions.
Do note, however, this table does not take into consideration the width of the frame. If you planning to purchase and frame and a mat, use this guide to select the mat, then choose a complementary frame that suits the mat size. We'll get to that in the Frame and Mat Widths section.
UNITED
INCHES |
MAT BORDER
WIDTH |
| 6" or less |
3/4" |
| 7" - 8" |
1 " |
| 9" - 10" |
1-1/2" |
| 11" - 24" |
1-3/4" |
| 25" - 32" |
2" |
| 33" - 36" |
2-1/4" |
|
UNITED
INCHES |
MAT BORDER
WIDTH |
| 37" - 40" |
2-1/2" |
| 41" - 44" |
2-3/4" |
| 45" - 52" |
3" |
| 53" - 58" |
3-1/4" |
| 59" - 64" |
3-1/2" |
| 65" - 68" |
3-3/4" |
|
(United Inches is the sum of the width + height of your image.
In other words, an 8x10" image is 18 united inches.)
|
A thin mat is reduced to an insignificant border
A wide mat creates a crisp, modern look
|
| BOTTOM-WEIGHTING: YES OR NO?
|
|
|
If you've been visiting framers, you may have been told about the traditional practice of "bottom weighting" a mat. This is done simply by making the bottom mat border slightly wider (thicker) than the rest of the borders.
This method was adopted in the 19th century to combat an optical illusion created by the hanging style. At that time, framed art in galleries was hung above eye level, and tilted out from the wall so the viewer, looking up, would be able to see it.
Since the viewer was closest to the bottom of the frame, the bottom leg of the mat appeared to be thinner than the other three sides, through all were in fact equal. Widening the bottom border by 10-20% balanced this uneven appearance.
Today, however, framed art is almost always hung at eye level. Though bottom weighting is no longer necessary, many framers still follow this traditional style. It is also a popular way to fit art into a frame that does not allow for equal mat borders.
Today, assuming you are hanging your art at eye level, bottom weighting is a matter of personal taste. There isn't much point in bottom weighting an eye level image at 10%, since that percentage is intended to be unnoticeable. However, much like the advent of the very wide mat, a home decor style that heavily weights the bottom border has become popular in recent years.
Note: "Top centering" is very similar to bottom weighting. The top and side mat borders will all be the same size, while the bottom border is slightly wider. This is another way to fit a matted image into a standard frame.
|
Traditional bottom weighting is not very noticible
Exaggerated bottom weighting serves as a style in itself
|
| FRAME AND MAT WIDTHS
|
|
|
If you started out with only a photograph or art print, and you have now determined the width of the mat, your work is not quite finished. Even though you know the interior dimensions of the frame, there is still the matter of selecting a frame that does not undo all the planning so far.
I'm not referring to frame style in this case. Based on the artwork and the existing decor in your home, you can choose an ornate, old fashioned frame, or a stark, simple moulding. The width of that frame, however, comes into play when discussing mats.
The basic rule: The width of the mat should be at least double the width of the frame.
Like all other picture framing "rules," you can feel free to break this one, but it is based on sound aesthetics. The job of the mat is to draw the viewer's eye in toward the artwork, but if a four inch frame is paired with a two inch mat, the frame dominates the outer regions of the display, and the eye might never quite make it to the art.
When the frame and the mat are approximately the same size, they end up vying for the attention of the viewer, therfore splitting the focus, and still distracting from the true, intended subject of the piece.
|
|
Thin mat, thin frame:
The mat is too thin
|
Mid-sized mat, thin frame:
A classic look
| 
Wide mat, thin frame:
Crisp and modern
|
|

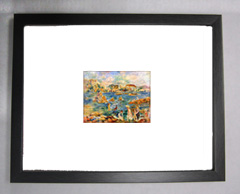
Thin mat, thick frame:
The frame overpowers the mat
| 
Mid-sized mat, thick frame:
Mat and frame vie for focus
| 
Wide mat, thick frame:
The frame takes away from the image
|
|
| DISPLAYING MULTIPLE FRAMES
|
|
|
You might imagine if it's this complicated to choose the mat size for a single image it must be infinitely more complicated to select mat sizes for a group of images that you plan to hang side by side on your wall. In fact, if you opt for the same frame - size and style - for each image, you can quite easily create a very cohesive and eye-catching display.
The most important part of this method is selecting the right frame. If your images are all quite different, you probably want to stick with a simple metallic or black frame. Or, if they are all similar, you can draw from a shared element. For example, if you have six images taken at the family farm, you may select a rustic, raw wood frame.
Once you have chosen the moulding, pick the size based on the largest of the images. The size will accomodate the mat for that frame, whether you choose a basic, traditional medium-wide style with equal weighting on all sides, or a very wide, off center mat. If you choose the latter, however, keep in mind that every other mat in the display will be even wider that that.
Mat size for the largest image selected, you can now have a bit of fun. You already know the outer dimensions of all your mats, but you need to decide on the layout for the rest of the pictures.
- Centering: This option involves centering each picture in the very middle of the frame. The mat surrounding it, then, will vary, with some having more weight on top and bottom than the sides, and others perhaps the opposite. You may be surprised how little visible the size differences are with this option. (If you chose a bottom weighted mat for your first image, however, this option doesn't work.)
- Top Aligned: The second option is to arrange all the tops of your images at the same point. In other words, whether the picture is 4" long or 8" long, the top arm of the mat is 2" wide. The result is a more evident difference between the picture sizes, but this might suit your decor and style.
Whichever option you choose, you can go on to hang the images in any assemblage you wish, and even change them around as the mood suits. Since the frames are all the same size and will be even across the wall, you don't have to worry about different nail heights or strengths.
Of course, you always have the option to frame each image in its own, unique frame for an ecclectic look. If you are hanging these mismatched frames all together, though, I might suggest sticking with one color and perhaps one mat style for the whole.
|

(1) Center the images in the frame
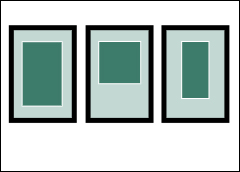
(2) Align the images across the top
|
|
The width of mat you choose will directly affect the look of your artwork, so it is important to take the time to consider and select the best mat style for your purposes. A mat won't make a bad piece of art better, but it can make a beautiful piece of art really shine!
When you've settled on the perfect mat style, head over to our wide selection of custom matboards to place your order.
If you have any questions about this or our other products and services, please do not hesitate to contact us. Our knowledgeable staff are always happy to offer answers, advice or suggestions.
|
| PRODUCT ORDER PAGES
|
|
|
|
 |
Custom Wood Frames:
Our quality framing solutions include a wide range of custom-made wood 7 METAL frames in various styles and sizes.
To start Click here. |
|
 |
Fine Art Paper Printing:
We offer affordable Fine Art Inkjet Printing as a custom service for artists, commercial photographers and anyone else concerned with producing top-quality archival prints.
To start Click here. |
|
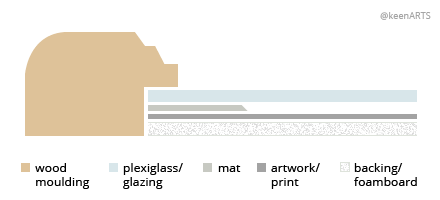
| MatBoard Guide: |
|
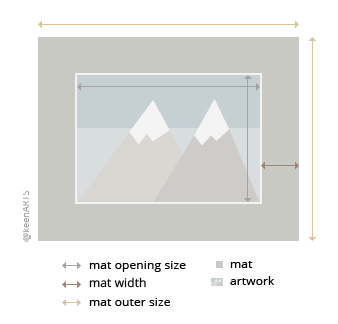 Single Matboard Sample |
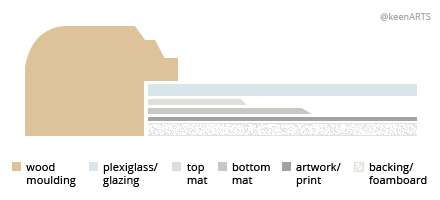
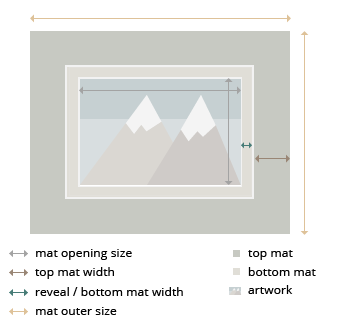 Double Matboard Sample |
|
Terms:
Top Mat: Top layer of a double mat; It has a larger window, which allows a small border of the bottom mat, called the reveal, to be shown.
Bottom Mat: Optional second layer of matboard used in double matting; The window opening of the bottom mat surrounds the artwork.
Reveal: Width of the bottom mat, normally 1/4", 3/8" & 1/2"
Mat Outer Size: Also known as frame opening size, matches the plexi glass or backing size of the picture frame
Artwork Size: The exact size of the artwork!
Mat Opening Size: Size of the matboard window cut out
|
|
|
Our informative articles on MatBoards:
Choosing the Best Mat Size The article offers helpful tips on selecting the appropriate mat size for your artwork.
Measuring for Mats All about Mat Outer Size, Artwork Size and Mat Opening Size
Choosing Mat Color How to select the best colors of mat fo ryour artwork
All About Mats The article discusses the different materials and attributes of picture framing mats and more!
|
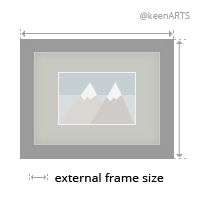
Front Side |
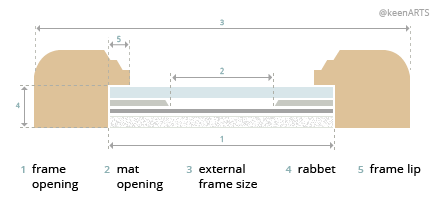
Picture framing terms |

Back Side |
| Matboard FAQs: |
|
Q1 : Does my artwork need a mat?
Whether or not to add a mat to your image is entirely up to you. If you intend to sell the artwork or pass it down as a family heirloom, an acid-free mat is a good idea to protect the image from the condensation that may occur on the glass. But if you are simply framing family photographs or an art print, the mat is a purely aesthetic option.
Order online:
Custom-cut matboards
Full sheet, 32x40" matboard
Q2 : What color is your whitest white?
We offer many shades of white mat board. Crystal White is our brightest white.
Order online:
Custom-size mats
Full, 32x40" matboards
Q3 : What is backing board?
Backing board is used to back or mount prints inside a frame.It is slightly thinner than a 4-ply matboard. It
Order online: Backing Boards
Q4 : Do you sell full sheets (32 x 40)?
We currently sell full matboard sheets (32x40") in certain colors.
Order online:
Full, 32x40" matboards
Q5 : What is the purpose of a mat?
Matting is the border that surrounds your art within the frame. Visually, the mat boards provide "breathing room" from any distractions on the surrounding wall including the frame. The other usage of Mat is separating the artwork from the plexi or glass.
Q6 : Should I get an acid-free mat or a regular mat?
Acid- and lignin-free mats guarantee no artwork degradation will occur because of the mat for hundreds of years. If you plan to sell your piece or show it in a gallery, a Museum core mat board is advisable. However, if you are simply framing an inexpensive piece or a print to show in your home, you should be fine with a regular mat.
Even our regular mats are treated with calcium carbonate to keep them acid-neutral for 100 years.
Q7 : How do I choose the best color mat?
A colored mat is a great way to enhance or draw out certain sections of your artwork. At the same time, a colored mat can have a detrimental effect if it does not flatter the artwork colors. Try laying different mats on top of your artwork to help you decide. If no color seems to fit, a mat in one of our many shades of white is always a good choice.
Order online:
Custom-size mats
Q8 : How much of my image will the mat cover?
The mat will cover 1/8" to 1/4" on each side of your image. This overlap is essential to ensure your artwork remains behind the mat and does not fall through. We recommend the default overlap of 1/4", but if your artwork has many important details along the edges that you do not want obscured, we can cut the mat to have an 1/8" overlap.
If your image has a white border around it, do not cut this off prior to matting. We can minimize the amount of overlap on the actual image if there is enough space around the edge.
Q9 : What is the difference between regular, conservation, and museum mat boards?
Regular mat boards are made from wood pulp, treated with an acid-neutralizer that minimizes negative reactions between the mat and artwork. They are our least expensive mat board.
Conservation mat boards have a core of acid- and lignin-free cotton, and a facing of wood pulp paper. They protect the artwork from acid burn and degradation for at least 100 years, and have a mid-range cost.
Museum core mat boards are made entirely of cotton rag paper. They are guaranteed to have no adverse reaction with artwork for hundreds of years. Museum mat boards are the most expensive and the best quality.
Q10 : Do you have more mat options than are on your website?
We do carry other options for mat boards, but they need to be ordered in, and this can delay your order. Please contact us if you require a different mat.
Q11 : How wide should my mat be?
The width of the mat is up to the customer, but we can provide some general guidelines.
For average sized artwork (about 11x14" to 30x20"), the common mat width is 2". If you artwork is smaller, you might consider a 1.75 or 1.5" mat. If you artwork is very large, a 3" or 4" mat may be necessary to ensure an aesthetically pleasing ratio.
Please see our article Measuring for Mats for more information.
Q12 : How do I order a mat board with my frame?
When you select the frame size to order, you will see an option to add "mats" to your order. When you select this, you can choose your mat color. The mat width is the thickness on one side, between the frame and the artwork (generally about 2"). If you are selecting two mats, the reveal is the amount of the bottom mat that will show between the artwork and the top mat.
Q13 : Do you carry different thicknesses of mat boards?
We can make your order with 8 ply mat boards in basic colors, however we do not keep them in stock, so ordering them may delay your order by a few days. We offer a wide selection of colors in the regular 4 ply thickness, and a double mat is a good option if you require a thicker division between plexiglass and image.
Q14 : Can I come into your store to choose a matboard?
If you are located in the Vancouver area, you are welcome to stop by our store and go through our mat samples. Unfortunately, we are an online business and do not have storefronts in other locations.
Q15 : Can I get a mat larger than 32x40 inches?
Unfortunately, our mat boards do not come in a larger size than 32 x 40, so we are unable to accommodate oversize mat orders. Have you considered having your artwork printed with a colored border?
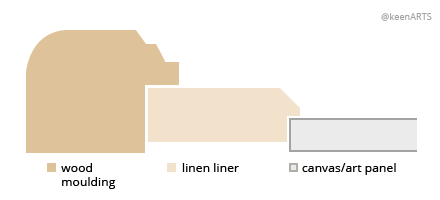
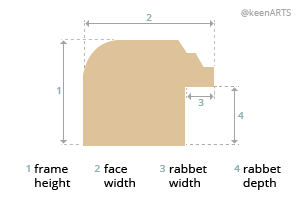
Another option for larger artwork is to purchase a linen liner. Because these are custom made like picture frames, you can order larger sizes. Please note, however, that liners are thicker than matboards, and may require a frame with a deeper rabbet.
Order online: Full, 32x40" Matboards
Q16 : What brand are your mat boards?
Our mat boards are made by Peterboro. This Canadian company has been in the paper-making business since 1902, and their products are manufactured in and distributed from Canada.
Q17 : What is the difference between mat, matt, and matte?
Though "mat" is the most widely recognized spelling, all three words mean the same thing: a rigid paper border that divides the image from the glass and the frame.
"Matte" or "matt" may also refer to a smooth, non-reflective finish.
Q18 : How many different matboard colors do you carry?
We stock 50 regular matboard colors, as well as about 30 conservation and 18 museum core colors. However, we are able to order any color you would like. Contact us if you do not see the color you want on the website. Please remember that ordering a mat we do not have in stock will delay your order a few days.
Order online, or view our full selection in stock: Matboards
Q19 : What is the mat offset?
The offset is the amount that your mat is smaller than your image. This slight overlap ensures your artwork will not fall through your mat. However, you do not need to factor this measurement into your calculations - we will automatically cut your matboard 1/8" to 1/4" smaller on each side than your artwork size.
Q20 : What calculations do I need for ordering a mat?
All you need to know is the size of your artwork, and the width of the mat border (usually about 2" on each side). Both these amounts can be entered in our online form when you place your order.
We will do all other calculations for you, such as the mat offset and the total frame size.
Please see our article, Measuring for Mats for more information.
Q21 : What is the mat window?
The mat window, or mat opening, is the space between the two inner edges of the mat - the hole through which your artwork will show. The mat window is generally 1/4" to 1/2" smaller than your artwork vertically and horizontally. This allows for the mat offset, which overlaps your image 1/8" or 1/4" on each side, keeping the art from falling through the mat.
Q22 : Can I order Custom Cut Frame MatBoards?
Yes, to order click here: Custom Cut MatBoards
Q23 : What is the fifference between 4 ply or 8 ply matbaords?
Ply is the thickness of the matboard. The most common thickness used is 4 ply (around 1/16th of an inch) and double thick matboards are 8 ply or roughly 1/8 inch thick. The higher the number, the thicker and more rigid the board. Ply means a thickness or layer.
|
|
| If you don't find the answer you're looking for here, please contact us. |
|

|


|
USA Giclee On Canvas, Fine Art Printing - Art Scanning & Reproductions - Handmade Oil Paintings - Custom Wood Panels, Metal Picture Framing - Block/Plaque Mountings, Large Format Dry Mounting & Lamination - Art Supplies: Stretcher Bars, Cradled Wood Panels and Artist Canvas - Collages On Canvas - Plexi/Acrylic Face Mounts - Block Acrylics, Fabric Printing, Dye Sublimation - Cityscape Skyline Prints, Resin, Photo Gifts and more...
|
|
© 2002-2026 - KeenART Media Ltd.
|
|
| |
|