| The Art of Hanging Art
|
 |
| Hanging art can be tricky business. Thankfully, we've got a few tips that might be able to help you with your home decor endeavor.
|
| 1. Hang the Middle of Your Artwork at Eye Level
|
|
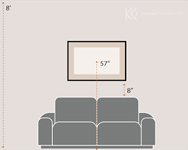
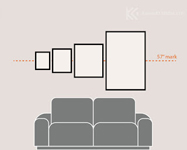
| The most common home decor mistake is hanging artwork too high. A good rule of thumb is to hang the artwork so that the center of the piece is at eye level. This can vary from person to person, so we recommend making the middle of the piece is 57" off the ground. From there you can adjust as you see fit.
|
|
| 2. Size Your Artwork to Fit Your Space
|
|
| The next most common error of home decor is not choosing the correct size art for your space. Whether you're hanging a statement piece over a sofa or pairing two postcards in your hallway, here are some tips to keep in mind.
For large, blank walls above mantles or sofas, try looking at pieces in the range of 36" width and longer. The general rule of thumb is to make sure your art piece or collection is about 2/3rds to 3/4ths the length of the furniture it is hanging over. For breathing room, hover your art so that it is above 8" off the sofa or furniture.
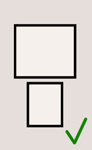
For smaller spaces, size is less of an issue - but placement becomes important. If you are stacking two images, put the heavier one on top. This guides the eye to "trail down away", rather than ending abruptly with chunky piece.
If the images are the same width but different orientations, stack portrait above landscape.
Remember that when you pair artwork together like this, together they act as one "piece". Make sure the centre of the "piece" sits at eye level, to avoid losing the bottom piece completely out of vision.
|
|
| 3. Keep Your Collections along a Horizontal or Vertical Axis
|
|
| Sometimes, you may have a lot of small pieces, rather than one large artwork. If you have many small prints (think 8x10, 5x7, 11x14s), then an asymmetrical collection or gallery wall may be what you're looking for.
Asymmetrical collections and gallery walls are excellent layout options for eclectic groupings, but are at risk of looking haphazard and unorganized if one is not careful. To keep a sense of unity, make sure that your collection follows a horizontal and vertical axis.
While the edges of the frames don't have to follow the axis perfectly, if you were to dissect your collection in half, both sides should appear balanced.
When making collections, aim for some consistency between your pieces. Whether it's by theme, mat color or frame choice, a consistent aesthetic will help keep your pieces looking unified and organized.
|
|
| 4. Pick an Anchor Line
|
|
|
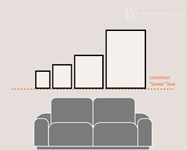
If you like putting your pieces together in a group but don't want to risk a haphazard look, try picking an anchor line and lining up all your artworks within that line. This works best with prints that are all the same size, which you can make symmetrical groupings out of.
Common lower lines are excellent anchors. Most interior designers will put them on a shelf, which also eliminates the hassle of hanging them from the wall.
This is the most common anchor line. Although the composition is unbalanced (simply to show size differences between common frame sizes), it still looks clean, organized and structured.
Upper lines are usually not recommended, as often this results in the artwork being hung too high. However, for large, singular pieces such as rugs, tapestries, or vertical canvases, this line will act as an invisible bar for them to hang from.
|
|
| 5. Plan It Out
|
|
|
Hanging art is an art in of itself. Smoothing details like spacing and composition early in the game can save your framing from looking tilted, dizzy, or sloppy, and ultimately unify your gallery cohesively.
Print out standard frame sizes (such as 8x10s, 11x14s, 24x36s) on paper (or measure them out on newspapers or poster paper), and tape them up on your wall in different configurations. Once you like your set-up, then decide which art piece should be framed and matted accordingly.
|

|
| Additional Resources |
|
|
Learn how to use custom picture framer software by clicking here.
Learn how to tie wires on picture frames by clicking here.
Learn how to take care of your fine art prints by clicking here.
|

KeenART Media
|
|
If you have questions about any of our services or products, don't hesitate to contact us. Our knowledgeable staff is always happy to assist with answers, advice, or suggestions.
|
|
Secure SSL-encrypted checkout

|


|
USA Giclee On Canvas, Fine Art Printing - Art Scanning & Reproductions - Handmade Oil Paintings - Custom Wood Panels, Metal Picture Framing - Block/Plaque Mountings, Large Format Dry Mounting & Lamination - Art Supplies: Stretcher Bars, Cradled Wood Panels and Artist Canvas - Collages On Canvas - Plexi/Acrylic Face Mounts - Block Acrylics, Fabric Printing, Dye Sublimation - Cityscape Skyline Prints, Resin, Photo Gifts and more...
|
|
© 2002-2026 - KeenART Media Ltd.
|
|
| |
|