| HOW TO TIE WIRE ON PICTURE FRAMES |
 |
|
Once your framed artwork or canvas print has been mounted, you'll no doubt be in a hurry to get it up on the wall. It's important not to rush the hanging hardware and wire application, however. Your hardware must be strong enough to hold the piece, and the wire must be tightly wrapped to avoid slipping and unravelling.
At KeenART Media, we apply hanging hardware and wire to all artwork that is finished in our warehouse. If you order frames you'll be fitting yourself, or canvas prints you'll be stretching at home, this guide is a useful outline for ensuring your artwork stays safely up on your wall for years to come.
|
SUMMARY
This article explains how to apply hanging wire to the back of a picture frame or canvas print, as well as a brief overview of finishing and attaching hanging hardware.
| FINISHING |
AFFIXING HARDWARE |
ATTACHING WIRE |
- Framer's points/turn buttons
- Taping
- Bumpers
|
- Strength of hangers
- Position of hangers
|
- Strength of wire
- Double wrap method
- Slipknot method
|
|
| PREPARING FOR THE WIRE - FINISHING
|
|
After the print has been framed or mounted, but before the hanging hardware and wire are added, a few steps are taken to ensure you receive a professional, properly protecting piece of art.
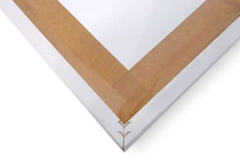
Canvas Prints
Once the canvas print has been been stretched (for more information on that process, see our How It's Made article), cloth tape is applied to the back edges of the canvas and frame. This makes the back side neat and crisp, and prevents dust and bugs from getting between the staples.
Another finishing option is to place brown kraft paper across the back, affixing it with double-sided tape.
After the back is cleaned up, felt, foam or rubber bumpers (small circles or squares of material with adhesive backing) are affixed to the bottom corners of the artwork. They prevent the piece from scuffing the wall.
If you are stretching your canvas print at home, you can purchase cloth tape from out Art Supply Store.
Start your order from our Canvas Prints page.
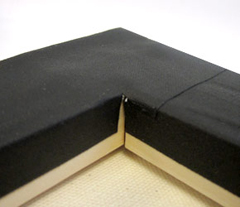
Framed Prints
Once the contents of the frame are in place, turn buttons or framer's points are placed at equal increments around the back of the frame, holding the contents in. To learn more about this process, visit our Frame Fitting article.
The framer's points can be hidden by applying brown paper tape to cover both the back of the frame, and the backing board. This keeps dust and bugs from working their way between the layers of the artwork, and produces a neat finish. If turn buttons were used instead, and you may be changing out the artwork in the future, tape is not necessary.
Just like canvas prints, bumpers are placed in the bottom corners to protect the wall.
For attaching hardware to metal frames, see our Assembling a Metal Frame article.
Start your order from our Fine Art Prints or Custom Picture Frames page.
|
Canvas print finishing
Picture frame finishing
|
| AFFIXING THE HARDWARE
|
|
STRENGTH
When selecting hanging hardware, it is important to choose hangers that are designed to hold as much or more weight than the weight of the artwork. When in doubt, too much strength is better than too little.
Depending on the size and weight of the artwork, you may need a single hole D-ring (about 20 lbs), a double hole D-ring (about 40 lbs), or a steel plate hanger (50-100 lbs, depending on style).
For very small or lightweight artwork, a sawtooth hanger may be suitable. One is used for very small pieces, while two or three can be distributed across long, narrow panoramas. They are hammered or stapled onto the top arm of the frame.
POSITION
Where the hardware is placed is also important. As a rule, the hangers should be placed on the vertical arms of the frame, directly across from one another, between 1/4 and 1/3 of the total height down from the top of the artwork.
If the wire is placed too high, the wall hook or nail can interfere with the frame, or the display may be unsteady. If the wire is placed too low, the top of the frame may lean too far out, and the weight could pull the wire off the hook.
Ideally, large artwork will have the hanging hardware attached closer to 1/4 of the way down, while smaller pieces should be about 1/3 of the way down.
The hanging hardware is screwed or nailed to the frame arms. Be certain to check the length of the screw to ensure it won't pass through the front or other side of the frame. For framed prints, the hanger will be attacked to the back of the frame.
For canvas prints, some framers attach the hardware to the back of the stretcher frame, while others place it on the inner drop edge. If kraft paper was applied in finishing, of course, the hardware must be placed on the back.
For more information on hanging hardware, see our Hanging Hardware Guidelines section in Picture Framing Guidelines article.
We offer many different types of hanging hardware for sale on our Art Supply Online Store.
|
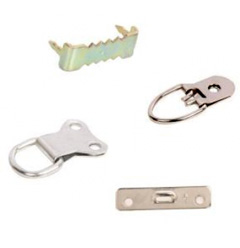
From top : Sawtooth hanger, D-ring, Steel plate hanger, Two-hole D-ring
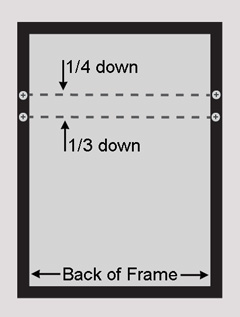
Hardware position
|
| ATTACHING THE WIRE
|
|
Now you're ready to attach your hanging wire!
STRENGTH AND LENGTH
Just as in the case of hanging hardware, it is vital you choose picture hanging wire that can support the weight of your frame. Most spools of wire will have a weight limit indicated on the packaging. Plastic-coated picture hanging wire is available in many different strengths from 20 lbs to
For a list of picture framing wire weights, see our Hanging Hardware Guidelines section in Picture Framing Guidelines article.
Buy plastic-coated picture hanging wire from our Art Supply Online Store.
Once you've selected your wire, cut a piece 8-12" longer than the horizontal width of your artwork. This will ensure you have plenty of wire for wrapping.
There are many ways to safely and securely wrap or tie the wire around the attached hardware. Below are two popular methods:
THE DOUBLE WRAP
- Thread one end of the wire through the ring of the hanger.
- Pull through 4-6", then crimp the wire around the ring. Pass the wire through the ring again.
- Beginning at the point where the wire meets the ring, coil the short end of the wire around the long end, pulling tightly and wrapping neatly.
- Draw the wire across the frame and insert it through the other ring. Crimp the wire around the ring and hold firmly.
- Pull the wire up slightly in the center of the frame. There should be enough slack that the tip of this "triangle" is a few inches closer to the top of the frame than the hangers. In most cases, this center point will be about halfway between the top of the frame, and the hangers.
- Repeat steps 2 and 3 for the second ring.
THE SLIPKNOT
- Thread one end of the wire through the ring of the hanger, going from over top to bottom.
- Pull through 4-6", then crimp the wire around the ring. Take the short end of the wire over the long end, and pass it through the ring again, this time from bottom to top.
- Slip the short end of the wire through the loop created above the long end and pull tightly to make a slipknot.
- Coil the rest of the short end around the long end.
- Follow steps 4 and 5 above.
- Repeat steps 2-4 for the second ring.
Once the wire is affixed to the frame, you can hang your artwork on the wall! Make sure you select a wall hook that is strong enough to hold the weight of your frame. For panoramic or very wide frames, you may want to place two wall hooks to distribute the weight of the frame.
You can purchase wall hooks from our Art Supply Online Store.
|
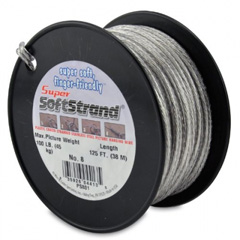
Picture hanging wire
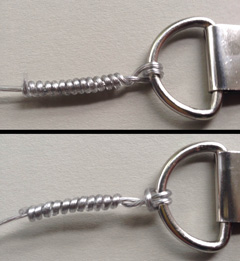
Top: Double wrap; Bottom: Slipknot
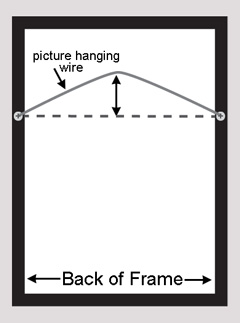
Picture wire height
|
|
Hanging your artwork correctly will ensure the cleanest and safest display of your special piece.
To see the wide range of hardware you can use to hang your wired artwork on the wall, read our Hooks for Hanging Wall Art article.
If you have questions about the best way to apply hanging hardware, displaying your frame, or any of our other services or products, don't hesitate to contact us. Our knowledgeable staff is always happy to assist with answers, advice, or suggestions.
|
|

|


|
USA Giclee On Canvas, Fine Art Printing - Art Scanning & Reproductions - Handmade Oil Paintings - Custom Wood Panels, Metal Picture Framing - Block/Plaque Mountings, Large Format Dry Mounting & Lamination - Art Supplies: Stretcher Bars, Cradled Wood Panels and Artist Canvas - Collages On Canvas - Plexi/Acrylic Face Mounts - Block Acrylics, Fabric Printing, Dye Sublimation - Cityscape Skyline Prints, Resin, Photo Gifts and more...
Frame Assembly Guide - Dovetail System
USA Laser Engraving & Cutting Services
|
|
© 2002-2024 - KeenART Media Ltd.
|
|
| |
|