| REPAIRING AND RESTORING OLD PICTURE FRAMES |
 |
|
Do you have a bunch of old picture frames that just don't fit your modern decor? Have you searched for quality frames at second-hand stores but can only find badly damaged ones? Worry not! Restoring an old picture frame is a great way to make something old new again, and have fun doing it.
This article outlines the process for restoring a picture frame, whether you want to brighten the old look, or do a complete overhaul. And once you've finished making your frame look brand new, KeenART Media can help you out with all the extras you need to get the wall art display you've always wanted.
|
SUMMARY
| STAY AUTHENTIC |
GILDED FRAMES |
MODERNIZE |
THE EXTRAS |
| This step-by-step guide explains how to clean your frame, restore loose joints, mend nicks and gouges, and create your own beautiful "re-new" picture frame. |
Frames finished with gold or silver leaf need a little more care and different treatment. These additional rules will make your shiny frame good as gold. |
If you're so over the old-fashioned style of your picture frames, don't be afraid to give them an update with tinited stains or paint. |
At KeenART Media, we can supply you with custom-cut window mats, backing and mounting boards, museum-grade plexiglass, and hanging hardware - everything you need to get your picture frame up on display. |
|
| KEEPING AN OLD FRAME AUTHENTIC |
|
|
The following steps explain the process for restoring an old frame. Put the white paint away - this section is all about authenticity!
- Clean it. Before you start messing with the frame too much, you'll want to make sure it's clean. Using a clean, dry paintbrush, gently dust the surface of the frame, being sure to get into all the little grooves. Be extremely careful around any chips or cracks, as you don't want to end up peeling away half the original face.
- Deep clean it. Using a small, clean towel, gently wipe the frame down with a non-flammable grease solvent or dry-cleaning fluid. Made with acetone, these products can remove glues, grease marks, and other stains from the face of your frame without damaging it. Though products like nail polish remover do contain acetone, your best bet is to buy a product intended for your purpose.
Be sure to turn or replace the cloth as it gets dirty. You don't want to spread that dirt around, or risk scratching the frame if you pick up something rough.
- Take it apart. Now you're ready to disassemble the frame. If the joints of your frame are perfect, you may not need to do these steps. If the frame is already old and you plan to keep it for many more years, however, it's not a bad idea to renew even apparently stable corners.
If the joints of the frame are quite loose, you can use a rubber mallet (or a hammer wrapped in many layers of soft cloth) to tap them apart. If they're pretty well attached, you can try to loosen them by gently flexing the joint, inserting a knife to pry them apart, or pulling out any finishing or V-nails (use pliers for this, not the end of a hammer). If you can't get the joints to separate, they're probably strong enough to hold up in the years to come!
It is possible to use 30% vinegar to dissolve wood glue at the joints. If there is any kind of finish on your frame, however, you will want to test a small section or do some research before placing a towel soaked in vinegar on your good frame.
Alternately, if only one joint is loose, you may be able to fix it without disassembling the entire frame. Gently wiggle that joint apart, and then follow the instructions below, but only for one side!
- Clean it, again. Once the joints are separated, remove any nails that are still protruding from the frame. Again, you'll want to use pliers for this, not the back of the hammer. You'll also want to scrape away any old glue on the corners. Try to remove it with dry methods, but vinegar is another option. Be careful you don't damage the visible parts of the frame, and be mindful of the fragile tips of the mitered ends - chips will show.
- Glue it. Use a non-staining carpenters glue to reassemble the frame. Regardless of the brand's claims, be sure to wipe off any glue that gets on the outside of the frame. You can use a small brush, Q-tip, or toothpick to apply the glue, depending on the surface area of the corner.
- Strap it. There are a number of different ways you can secure the corners of the frame while the wood glue dries. Holding it in place with your hands isn't one of them, since most glues take at least four hours to fully harden. Because of the mitered (45 degree angle) corners of most picture frames, you can exert quite a lot of pressure when strapping the frame.
You can buy a belt (or band) clamp like this one, which wraps around the frame and secures at the corners, holding the entire frame tightly in place. Create a makeshift clamp by wrapping a strong rope twice around the frame and knotting it. It's recommended that you insert a bar into the knot and twist to get it really tight.
This Instructables tutorial shows you how to make a corner clamp using just two pieces of wood and a regular C-clamp. This version only does one corner at a time, though, so you'll either want to make four, or glue each side just before you clamp it.
- Check the angles. With all the work you're going to, you'll definitely want to make sure your frame will hold your art. You can check that each corner is perfectly square by measuring both diagonals (top left to bottom right, and top right to bottom left). If the numbers are equal, your frame is straight. If the number isn't equal, you may need to shift a corner before the glue dries, insert some splints to space the wood more, or shave some of it away.
- Reinforce it. Once the glue has dried, you can reinforce the frame with new nails. If you have the tool for inserting V-nails, you can use that. Otherwise, finishing (or finish) nails - thin nails with almost no difference between the head and the body - can be hammered into the corners.
They should be placed near enough to the outside corner of the frame so they pass through both pieces of wood, but not so near they come out the other side, or weaken the frame corner.
Frames made from hard woods may require a pilot hole before inserting the nail. Make sure the hole doesn't pass beyond the first piece of wood. With softer woods, you should be able to simply tap them in.
If you can't or don't want to use finishing nails, or if you think you still need more strength, metal corner braces are another option. These L-shaped, rigid pieces are placed in the back center of your frame corner, echoing the angle of the frame. They can be attached with short screws or nails. Make sure the screws are short enough they won't pass through the front of your frame! Brass braces are better than steel, as they won't rust and discolor the wood.
- Fix nicks and dings. Using gesso or modelling paste, fill in any divots or gouges. Put a little bit too much in the hole, then file it down with an emery board once it has dried.
For smaller scratches, use scratch remover or wood stain in a similar color to the wood (you may want to test it). The stain can be applied with a small brush or a cotton swab. Then use a cloth-wrapped finger to blend the stain into the scratch.
Once the stain has dried, you can apply a matte, semi-matte, or glossy varnish to imitate the rest of the frame.
- Look it over. Apply an all-over coat of stain or varnish if you want to brighten up the old wood.
You now have a beautiful "like-new" piece of wall decor that you didn't have to break the bank to get! If the glazing and backing in your frame are still in good condition, you can use those with your new artwork. Otherwise, pop down to our Ordering the Extras section to find out how to order these important accessories.
|
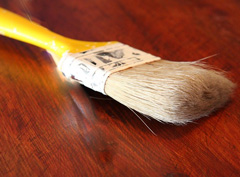
1. Use a clean paintbrush to dust the frame

6. A belt clamp will hold the frame while the glue dries

7. The diagonals should be the same measurement.
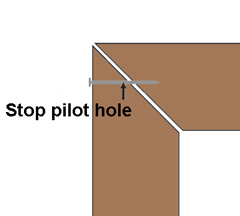
8. a) Finishing nails
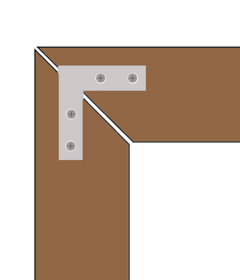
8. b) Metal brackets
|
| REPAIRING GILDED FRAMES
|
|
|
If the frame you are choosing to restore has been covered with gold or silver leaf, there are a few different steps you need to take.
You can still follow most of the steps in the outline above, but avoid the grease solvent and generally be more careful due to the delicate nature of the frame. Also try these alternative steps:
- Alternate Step 2: To clean gilded frames, after dusting use a soft brush soaked in a mixture of half ammonia, half water. Work the liquid into the corners to be sure any ground in grime comes clean. Gently shake the frame, then brush or wipe pure water over it, and shake it again. Do not rub it - let it air dry.
- Alternate Step 9: Use gilt in wax or paste form to repair any scratches on the face of the frame. Use a cotton swab to apply, and wipe it away with a cloth.
- Alternate Step 10: Apply an over-all coat of clear varnish if there are a lot of scratches, scuffs, dull spots, or crazing (spiderweb of lines, as is seen on old ceramic). Before painting on the varnish - satin finish is best - rub the frame with steel wool.
For a step by step tutorial on restoring a plaster and gilded frame that is very damaged, see this helpful Instructables tutorial.
|
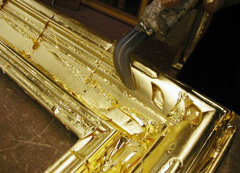
A gilded picture frame covered in gold leaf
|
| MODERNIZING OLD FRAMES
|
|
|
If you want to reuse your old picture frames, but aren't worried about preserving the original appearance, there is no limit to the makeovers you can carry out.
- If your old frames are wood without any gold leaf or intricate details, you can rub them down with sandpaper. Start with a coarse grain, and work your way up to 220 grit. Be careful that you don't round out the corners as you sand.
- If the joints are loose, you can completely disassemble and repair the frame following steps 3 through 8 in the section above. Alternately, you can just work some wood glue into the loose joints and clamp the frame without ever taking it apart. Be sure to wipe off any extra glue that gets on the face when applying, or once it is clamped.
- Once the glue has dried, fill any gouges with putty and sand away spots where the glue might have gotten on the face of the frame. Paints and stains won't cover the same over the glue, and could result in discolored splotches.
- You can apply a wood stain to the frame at this point, to maintain the natural wood but update the color, brightness, and finish. Once the stain has dried, buff the frame with superfine sandpaper and wipe it with a dry cloth.
Alternately, you can apply a primer, and then paint the frame an entirely different color. If you choose a dark paint for your frames, it is helpful to use a darker primer so fewer coats of paint are required.
This Martha Steward video shares some tips on painting old frames for a new look.
|
Paint the frame for a completely new look.
|
| ORDERING THE EXTRAS
|
|
If the glazing - glass or acrylic - backing, and hanging hardware from your old frame are just as dilapidated as the frame itself, you might want to replace all that. The great thing is, you'll already have your beautiful picture frame at no extra cost, so you might be able to spring for gallery-quality accessories to complete your display.
Glazing
At KeenART Media, we offer three different kinds of acrylic glass (plexiglass):
- Regular
- Non-Glare
- UV-Filtering Non-Glare
The acrylic we use is also used by museums and professional art galleries. It is crystal clear, sturdy at 3mm thick, and will last as long as your frame. You can order just acrylic by visiting our Mounting Boards pricing page and entering the size of your frame opening. Select the type of plexiglass you would like from the drop down menu.
Window Mats
We offer custom cut, Peterboro matboard in a wide variety of colors and three different grades: White Core, Conservation, and Museum.
You can order your window mat in any size up to 32x40", from our Custom Matboard pricing page.
Backing
We also offer high quality backing materials for mounting your artwork or adding an extra, protective back to the frame.
The most common material for this purpose is foam board, which we offer in three different styles, and two thicknesses:
- White foam board - 3/16" and 1/2"
- Black foam board - 3/16" and 1/2"
- Acid-free foam board - 3/16"
If you want more rigid protection, you can order sheets of gatorboard, a strong foam board with a wood fiber veneer. Gatorboard is also available in black and white, and two thicknesses.
You can find the prices for our mounting and backing boards on our Mounting Boards pricing page.
Hanging Hardware
Need some extras? We've got you covered in the Framing Hardware section of our online art supply store. You'll find:
- wall hooks
- frame hangers
- picture hanging wire
- turn buttons
- bumpers, and more
|
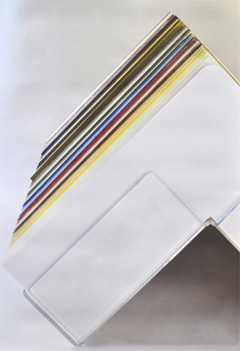
Mats in many colors
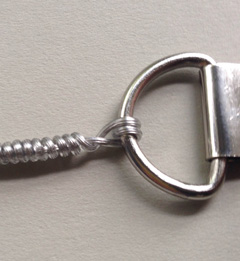
D-ring and coated wire
|
|
There's nothing more rewarding than making yourself something beautiful and useful out of something old. You can pick up old picture frames at estate sales, thift stores, garage sales, and leaning against outdoor garbage disposals! Keep an eye out, and you're sure to find some treasures.
If you have questions about any of our services or products, don't hesitate to contact us. Our knowledgeable staff is always happy to assist with answers, advice, or suggestions.
|
|

|


|
USA Giclee On Canvas, Fine Art Printing - Art Scanning & Reproductions - Handmade Oil Paintings - Custom Wood Panels, Metal Picture Framing - Block/Plaque Mountings, Large Format Dry Mounting & Lamination - Art Supplies: Stretcher Bars, Cradled Wood Panels and Artist Canvas - Collages On Canvas - Plexi/Acrylic Face Mounts - Block Acrylics, Fabric Printing, Dye Sublimation - Cityscape Skyline Prints, Resin, Photo Gifts and more...
Frame Assembly Guide - Dovetail System
USA Laser Engraving & Cutting Services
|
|
© 2002-2024 - KeenART Media Ltd.
|
|
| |
|